Garbage Disposal Repair: Fix a Humming, Jammed, or Dead Unit
Garbage disposal not working? The problem is almost always one of four things: a jam, a tripped reset, a power issue, or a drain clog. All are fixable — many in under ten minutes. This guide covers every symptom, from a garbage disposal humming but not spinning to a unit that won't turn on at all. Read the safety section first.
Safety first
Before you do anything, cut power at the wall switch AND at the circuit breaker. Two steps, not one. A disposal can switch on without warning, and the grinding chamber can seriously injure a hand in less than a second.
Never put your hand inside the disposal. Use tools — an Allen wrench, a wooden spoon handle, needle-nose pliers, or tongs — to reach inside or clear debris. This rule applies even when you are certain the power is off.
Once all work is done and tools are out, restore power and test. That is the only safe sequence.
Figure out which problem you have
Garbage disposal humming but not spinning = jammed. The motor has power but something is blocking the grinding plate (flywheel). Common culprits: a fruit pit, bottle cap, or small utensil lodged under the impellers.
Garbage disposal won't turn on, no sound = electrical issue. Check the reset button, circuit breaker, and GFCI outlet. See the section below.
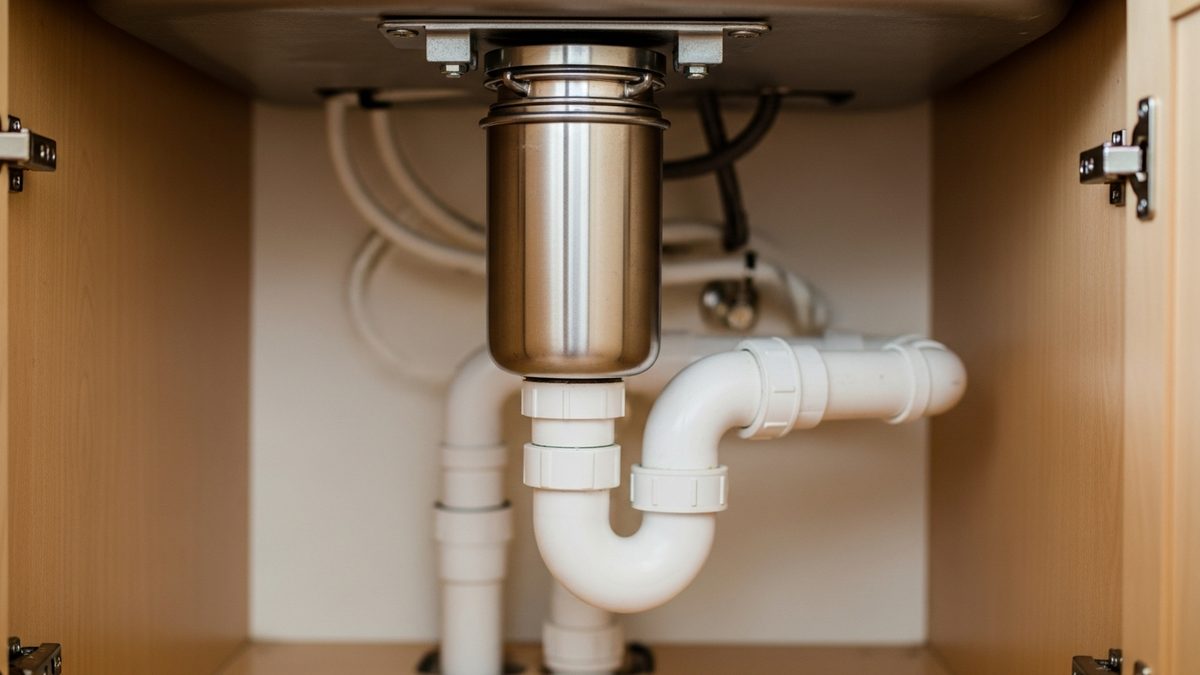
Leaking. Leaks at the top flange, side hose connections, or bottom of the unit each have different fixes.
Water backs up into the sink = drain clog. The blockage is usually in the P-trap or drain line below the disposal, not the unit itself.
Fix a humming or jammed disposal
A garbage disposal jammed on food or a foreign object needs the flywheel freed before the motor will spin again.
- Cut power at the switch and breaker.
- Use the hex socket on the bottom of the unit. Most disposals have a small Allen wrench socket in the center of the motor housing. InSinkErator models take a 1/4-inch Allen wrench. Insert and work it back and forth until the flywheel breaks free.
- No socket? Use a wooden handle from the top. Insert a wooden spoon handle and push against an impeller blade to rock it loose. Never use your fingers.
- Remove the object. With power still off, shine a flashlight into the drain and pull the jam out with needle-nose pliers or tongs.
- Press the reset button. The overload protector trips during most jams. Push the small red button on the disposal bottom until it clicks. If it pops back out, wait 5 to 10 minutes for the motor to cool and try again.
- Restore power and test. Run cold water, then flip the switch. Keep water running 30 seconds after grinding starts.
Fix a disposal with no power
Garbage disposal no power — no hum, no sound — needs an electrical fix, not a mechanical one. Work through these checks in order.
Press the reset button first. It is on the bottom of the motor housing — a small red button. Push firmly until it clicks. This one step solves most no-power calls.
Check the wall switch. A switch that feels "on" can still be faulty. Try wiggling it. Switches are inexpensive to replace.
Check the circuit breaker. At your panel, look for a breaker in the middle "tripped" position. Flip it fully off, then back on. If it trips again right away, you have a wiring issue — call an electrician.
Check for a tripped GFCI outlet. Many disposals draw power through a GFCI outlet under the sink or in a nearby cabinet. Look for an outlet with TEST and RESET buttons and press RESET firmly. If the outlet was dead, the disposal should come back. For plug-in models, test the outlet by unplugging the disposal cord and plugging in a lamp — if nothing works, the outlet is the issue.
Fix a leaking disposal
Top flange (around the sink drain). Dried plumber's putty lets the flange work loose. Remove the unit, scrape off old putty, apply fresh putty, and remount.
Side hose connections. Tighten the clamps on the dishwasher drain hose and the drain outlet. A cracked fitting or worn gasket is cheap to replace.
Bottom of the unit. This means the internal motor seals have failed — not user-serviceable. A disposal leaking from the bottom almost always needs to be replaced.
Fix a disposal that won't drain
If the motor runs but water backs up, the clog is in the drain line or P-trap, not the disposal. See our guide on how to unclog a kitchen sink for the full P-trap walkthrough.
If the chamber is packed solid, cut power, tong out debris, free the flywheel with the Allen wrench, and run plenty of cold water when you restart. Do not use chemical drain cleaners in a garbage disposal — they damage rubber seals and create a splash hazard.
When to repair vs. replace, and what it costs
| Situation | Typical cost (2025-2026) |
|---|---|
| Jam or tripped reset — DIY | $0 (may need a $5 Allen wrench) |
| Leaky hose fitting — DIY parts | $5 to $30 |
| Plumber to repair / reseal | $75 to $150 labor |
| New unit, DIY install | $80 to $350 (1/3 to 1 HP model) |
| Plumber-installed replacement | $250 to $600 total |
Under five years old with a jam or reset issue — fix it yourself. Leaking from the bottom or over ten years old — replace it. InSinkErator and Waste King cover most budgets; manufacturer warranties run 1 to 10 years depending on the line.
Common mistakes
- Hand inside the unit — tools only, always.
- Only turning off the wall switch — always cut the breaker too.
- Chemical drain cleaners — they corrode seals and splash back. Use mechanical methods only.
- Running the disposal dry — always run cold water before, during, and 20 seconds after grinding.
- Grinding the wrong things — fibrous vegetables jam impellers; fruit pits and bones can crack them; pasta and rice pack the drain; grease solidifies in pipes.
How to keep it working
Run cold water 15 seconds before you turn the disposal on and 20 seconds after grinding stops. Feed food gradually rather than dumping a full load at once. Once a week, grind a handful of ice cubes with cold water to scrub the grinding ring, then run a few citrus peels through to freshen odors.
FAQ
Why does my garbage disposal hum but not spin? The flywheel is jammed. Cut power, use the Allen wrench on the bottom socket to free it, remove the blocking object with pliers, press the reset button, and test. Full steps are in the section above.
Where is the reset button on a garbage disposal? On the bottom of the motor housing — a small red square or round button. InSinkErator calls it the overload protector. If it is sticking out, it has tripped. Push it until it clicks.
How long do garbage disposals last? Most quality units run 8 to 15 years. A disposal over 10 years old that keeps acting up is usually worth replacing rather than repairing again.
Can I pour Drano into a garbage disposal? No. Chemical cleaners damage internal seals and can splash back dangerously. Use mechanical methods — Allen wrench, tongs, and the P-trap.
Do I need a plumber? Jams, reset issues, and most drain clogs are DIY-friendly. Disconnecting water lines, replacing the unit, or tracing a wiring problem calls for a licensed plumber or appliance pro.
Get a pro near you
If the disposal still is not right after working through these steps, Local Service Group connects you with vetted plumbers and appliance professionals across the US. Free quotes, no obligation — fill out the short form on our site to get matched with a licensed pro in your area.
Sources
- InSinkErator. How a Garbage Disposal Works. insinkerator.com/en-us/kitchen-better/how-a-garbage-disposal-works
- InSinkErator. Support: Fixing a Jammed Disposal; Resetting a Disposal; Fixing a Clogged Disposal. insinkerator.com/en-us/support
- InSinkErator. Frequently Asked Questions. insinkerator.com/en-us/kitchen-better/faq
- U.S. Consumer Product Safety Commission. Home Safety. cpsc.gov
- Waste King / Anaheim Manufacturing. Product Installation and Use Guides. wastekingdisposers.com
Disclaimer
The information on this page is provided for general educational purposes only and is offered "as is" and "as available," without warranties of any kind, whether express or implied — including, without limitation, any warranties of accuracy, completeness, reliability, merchantability, or fitness for a particular purpose. It is not professional advice and is not a substitute for inspection, diagnosis, or repair by a licensed, qualified professional.
Home systems involving gas, electricity, water, refrigerant, fire, or structural components can be hazardous, and requirements vary by local code and jurisdiction. Any inspection, diagnosis, repair, installation, or other action referenced on this page should be performed by a licensed professional. You should not rely on this content to perform such work yourself. To the fullest extent permitted by law, [Company Name] and its owners, employees, and contributors assume no responsibility or liability for any injury, death, property damage, or other loss arising out of or in connection with the use of, or reliance on, this information.
If you smell gas or suspect a carbon monoxide leak, leave the area immediately and call 911 or your gas utility from a safe location.